Unity Connection Audiotext Manager
Connecting
to Unity Connection 7.x or Later
Task
2: Set the Database Proxy Service Shutdown Time
Task
3: Activate the Remote Database Proxy Service
Task
4: Login to the Remote Server
Previous/Next
Object Navigation
Generating
Visio Tree Diagrams
Overview
The audio text manager is an application designed to let administrators quickly and easily view, edit and create audio text applications in Unity Connection. Creating complex trees of call handlers, users, interviewers etc… that are tied together takes a fraction of the time and is less error prone than using the web based administration interface native to Connection. For sites using large numbers of handlers or with complex call flow scenarios this tool can be orders of magnitude quicker and easier for creating and viewing such applications.
Requirements/Special Notes
Audio Text Manager (ATM) can run on Windows XP/2000/2003/2008, Windows 7 32/64 or Vista 32/64.
This version of ATM requires .NET framework 4.0 or better. The install will detect if this needs to be installed and launch the setup automatically if it’s missing.
This version of ATM only works with Unity Connection 7.0(1) or later.
You must enable the ODBC proxy service on the Unity Connection server and attach to the database using an account enabled for the remote database access role. See the next section for details on this.
You must first install the Informix ODBC drivers before using this tool. Many off box tools for Connection 2.1(1) and later use these same drivers and you only need to install them once per client machine. You can download the installer for this on its home page here: http://ciscounitytools.com/App_InformixDrivers.htm
Connecting to Unity Connection 7.x or Later
For installations of 7.0(1) and later you need to use the database proxy service for access to the database from off box for any tool that uses database access.
Task 1: Configure a User without a mailbox with the Remote Administrator and System Administrator roles
1. Go to the Cisco Unity Connection Administration web interface for your installation.
2. You can leverage a user with or without a mailbox for off box data access purposes, but it’s strongly suggested that you create a new user without a mailbox that is used solely for the purpose of remote administration tasks for security reasons. This is also required if you want to export messages from a Connection 7.0(2) or later server – a user with a mailbox may not be allowed to extract messages from other mailboxes, whereas a user without a mailbox should have no problem.
3. Be sure the web administration password for this user is not configured to require a change at first login on the “Password Policy” page for that user.
4. If necessary, change the web administration password on the “Change Password” page. Note that only the web application password comes into play for remote data access.
5. Finally,
on the “Role” page for the user, add the “Remote
Task 2: Set the Database Proxy Service Shutdown Time
Out of the box the database proxy service is not running and if you try to start the service it will shut down right away. First you need to set the “Database Proxy: Service Shutdown Timer” value found in the System Settings -> Advanced -> Connection Administration section of the Cisco Unity Connection Administration page. By default this is 0. You can set it to as high as 999 days if you like. After the number of days configured here the remote database proxy service will shut down. This is useful if you want to do some migration work, for instance, and don’t want to forget to have the service disabled for security reasons.
NOTE: If you restart the server, the remote database proxy service will remain shut off. After a system restart you have to go in and manually turn on the service again (see step 3)
Task 3: Activate the Remote Database Proxy Service
1. Out of the box the service that listens to remote database requests is not active, you must turn it on. To do this, go to the “Cisco Unity Connection Serviceability” web admin page.
2. On the Tools menu, select the “Service Management” page.
3. The “Connection Database Proxy” item under the “Optional Services” section will be marked as “Deactivated” and stopped. Press the “Activate” button and it will be activated and started automatically.
Once you’ve started the proxy service you can connect with any tool that needs off box database access using the user name, web administration password and port “20532”.
NOTE: The service will automatically shut down after the number of days configured in step 2 above or if you restart the server.
Task 4: Login to the Remote Server
When you select to connect to a remote server from ATM, you will see a login dialog box that will be empty except for port 20532 filled in as the default for the port. You must provide the server name or IP address for the “Server” field and provide the login and password for the database connection account. Use the alias and web administration password of the database user created above for the login and password fields.
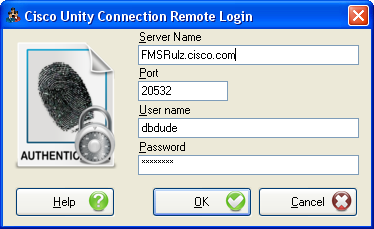
ATM will remember your entries including the password (which is stored in a secure hash). Each time you run ATM it will load the settings of the last connection you made. Every server you’ve successfully connected to in the past will be listed in the drop down list in the order in which you connected to it last – most recent to least recent.
NOTE: The login and password information is stored along with the local Windows login name. Only those servers that have been attached to successfully using the current Windows login will be listed. If you are logging into the same Windows server with different users you will only see servers connected to with that particular Windows login.
NOTE: Providing the wrong password or login will fail quickly and give you a chance to try a different pair. Providing an incorrect server or port, however, results in a 60 second timeout while ATM waits for the Informix ODBC driver to return. Unfortunately this cannot be shorted. Type carefully.
Using ATM
User Interface Basics
The ATM is made up of 3 basic view areas on the screen. The Tree and Grid view tabs on the left and the Object Details tabs on the right. Each is discussed below.
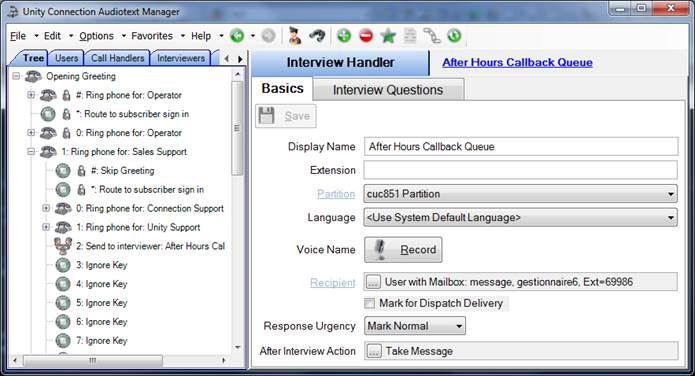
Object Details Tabs
The details view on the right is the main interface into the object details for ATM – all users, call handlers, interviewers and name lookup handlers can be selected and viewed in this interface using the navigation controls (tree or tables described below). There are tabs in this view that correspond roughly to the item groupings in the Connection web based administration interface.
NOTE: ATM is NOT meant as a complete replacement to the Connection administration interface. Most, but not all properties are available for updating in ATM. There is a link provided (in the shot below the blue underlined display name to the right of the “User” tab) that will open the Connection web administration interface directly to the currently selected object for easy access to items that may not be available in ATM. This is also true of other links provided in ATM – for instance in the show below the underlined titles on the left (Partition, Address Search Scope, Phone System etc…) are all links – if you click on them the web based admin for Connection will be loaded for that object for quick review and editing options.
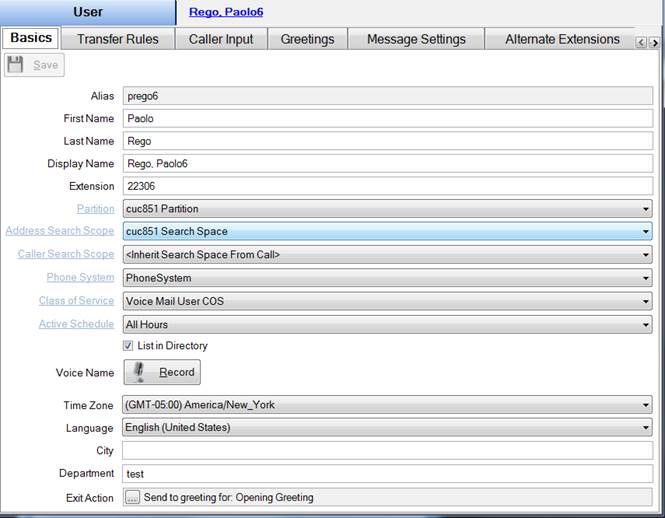
All the items shown on the details page use the same terminology found in the Connection documentation and the web based administration interface – I will not cover them all here, they should be straight forward mappings.
Recorder View
One items of special note is that you can edit and record voice names and greetings using ATM’s build in WAV file editing software – screen show shown here:
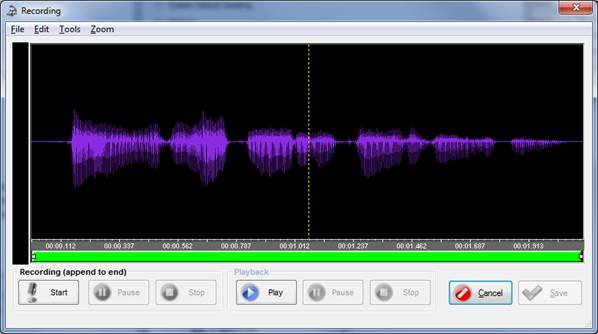
You can zoom in on the wav form for tight trimming editing. The tools let you insert multiple local WAV files into the playback stream, insert perfect silence, trim selected sections etc… this can be a powerful tool for editing greetings just the way you like them.
NOTE: You can use your phone to record audio instead of a local microphone device by checking the “Use Phone For Audio Recording of Greetings” menu item in the Options menu on the main form. When this is checked, when you select to edit or record a greeting it will ask you for a phone number to dial and you can record the greeting using the phone. Playback of the greeting will still download it and show it in the Recorder View above.
Tree View Tab
The tree view window on the left of the application is the main call flow navigation interface for ATM.
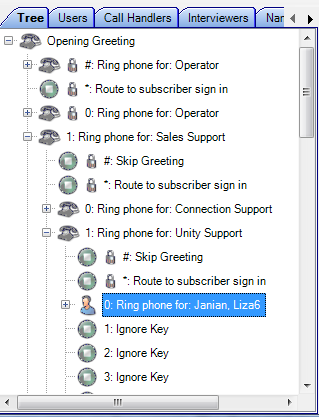
To create trees of objects simply right click on any node for a call handler or user and you can create a new action for that user input key including automatically creating a new call handler, user, interviewer or name lookup handler and having it automatically linked to that one key rule on the fly. This makes creating large, deep and complex audiotext trees much faster, easier and less error prone than doing it “manually” in the web based administration interface.
Object Specific Tabs
There are separate object view tabs for users, call handlers, interviewers and name lookup handlers to make it easy to find and view any object you like in the database quickly and easily. Each view tab contains sophisticated compound search options that can be used singly or in combination with one another. In the example shown below all the users that are members of the “Voice Mail Users COS” AND are a member of the “CUC851 Partition” are shown.
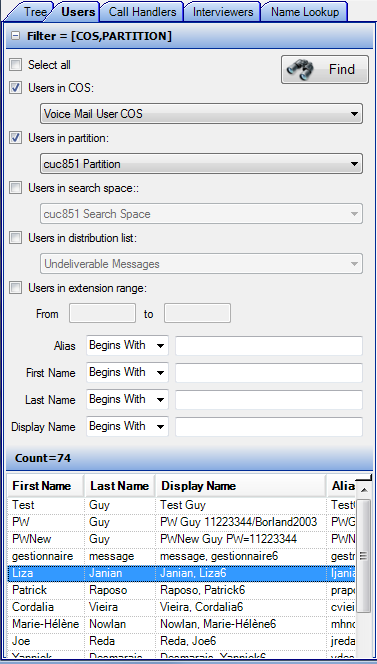
Once you select a search criteria (which can simply be the default of “show all” the search pane collapses to the maximum amount of screen space can be dedicated to the grid showing the objects themselves. You can simply click on the object you want and it will be loaded for you in the details pane to the right.
NOTE: ATM keeps the users you have selected locally – if you add users or edit them via another process external to ATM it will not know this until you reload the users.
Toolbar Action Items
The same items offered in the toolbar can be found in the Edit menu which can be reached with the keyboard.
![]()
Previous/Next Object Navigation
![]()
ATM keeps track of up to the last 20 items in the Connection database you’ve viewed. You can move back and forth in this list using these buttons or you can see the entire list by clicking the down arrow in the middle and select an object directly. This is meant to mimic a web browser type interface when navigating HTML.
Edit Routing Rules
![]()
The Edit Routing Rules option brings up the routing rules editing interface shown below.
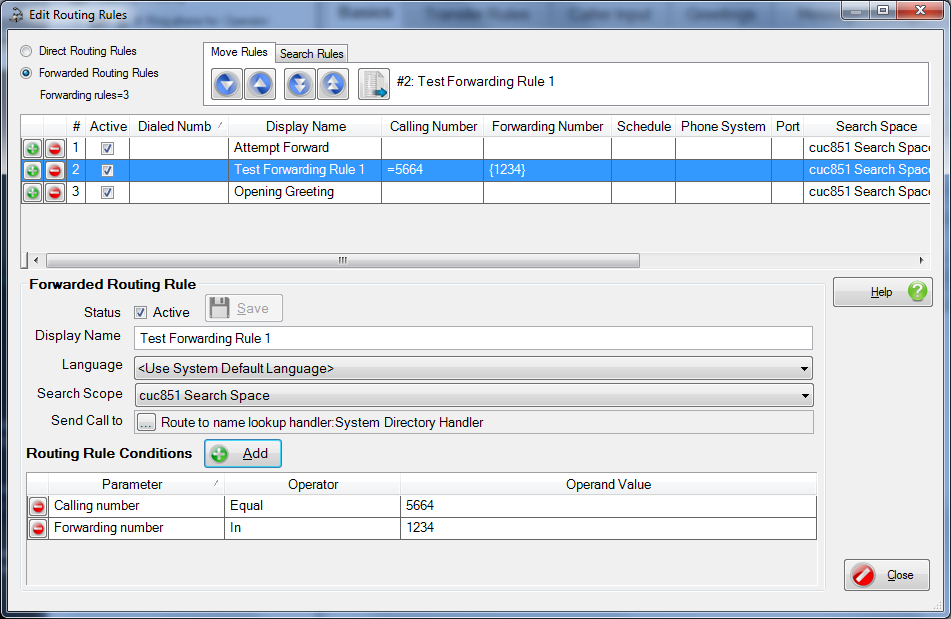
The routing rules editing interface allows you to create new rules (using the plus sign on the left of the grid at the top), delete rules (using the minus sign icon in the grid at the top), rearrange rules using the up/down arrows in the “Move Rules” tab at the top and edit/delete routing rule conditions at the bottom.
Find Items
![]()
The find items dialog is shown for this option and it allows you to search for any extension (primary or alternate), dialed number (for notification outdials or transfers) or email addresses uses at notification targets. You can search for exact matches or partials (begins with/contains/ends with). All matches are shown in a grid display shown in the screen shot below:
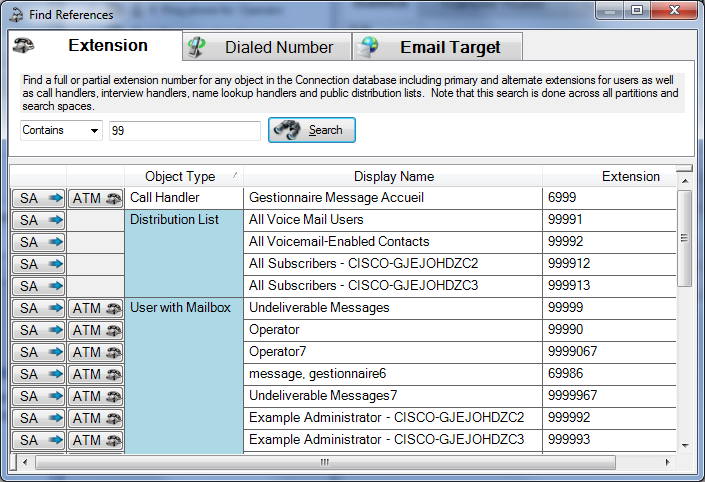
All object types are listed grouped together and you have the option of viewing the object in the ATM interface or via the web based SA interface (if the object cannot be viewed in ATM like a distribution list only the SA option is provided).
This can be helpful in running down “rouge” dial outs or email notifications erroneously configured by admins and/or end users or for finding out which objects are assigned which extensions across multiple partitions etc…
Add Object
![]()
This opens the Create New Object dialog that lets you create a new User with a Mailbox, Public Distribution List, Call Handler, Interview Handler or Name Lookup Handler
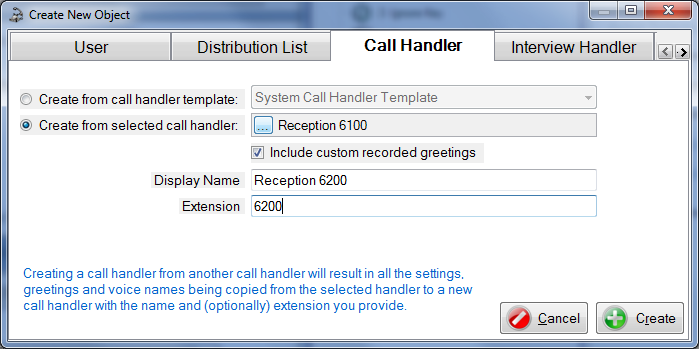
Special note: the call handler create (shown above) has a special feature allowing you to copy another fully configured call handler including its greetings and voice names and all one key routing rule definitions. For sites creating copies of the same call handler for a similar purpose for different sites this can save a lot of time.
Once created the object is automatically loaded into the details view of ATM for further review or editing.
Delete Object
![]()
This will open up the delete object dialog for the object that is currently loaded in the ATM details view:
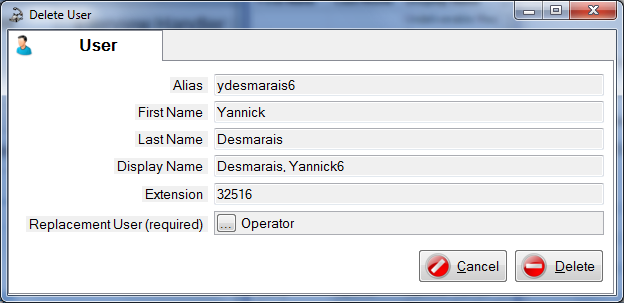
Note that for user deletions you will be required to provide a replacement user – this user is remembered in future uses and will load by default so if you use user that will be around in your system (such as the operator user for instance) it will always be preloaded. This is used to assign any references to the user being deleted to the replacement user so Connection will allow the delete to proceed even if that user is referenced somewhere in the database.
NOTE: You can run a dependency report (see below) to find out what all the references to a user are first if you prefer.
Add Current Item as Favorite
![]()
The currently loaded object is added to the favorites list so it can be loaded quickly via the favorites menu later if you like. If this item is already in the favorites list you are given the opportunity to overwrite it with a different display name for the favorite.
Make Current Item Tree Root
![]()
The currently selected user or call handler can be set at the root of the tree in the tree view tab using this option. This only applies to call handlers or users.
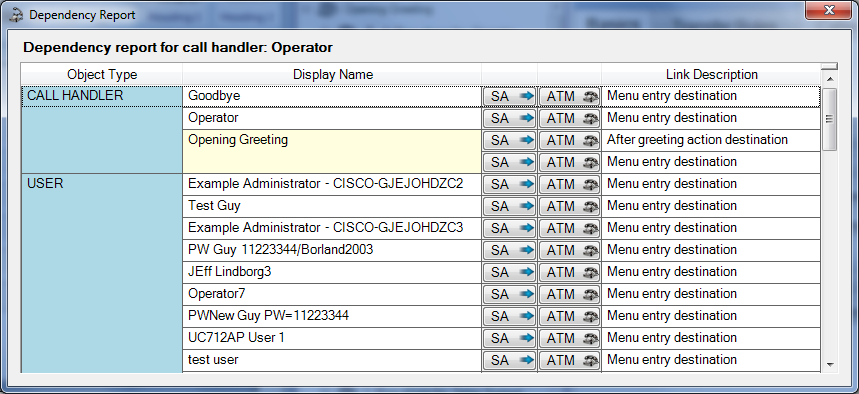
Check Dependencies
![]()
This opens the Dependency Report for the currently selected object in ATM. The dependency report will show all references TO that object, what it’s type is and what kind of reference is made (i.e. it’s a message recipient, menu entry destination etc…). Objects are displayed grouped by type and options for loading the objects in ATM and/or the web based SA interface in Connection are offered.
Refresh Database
![]()
Updates the current object details – NOTE that this does not automatically refresh object search lists that you may have cached – so you’ll have to press “find” again on those items to pick up newly added users and handler.
Menu Items
File
The file menu contains the following options:
· Export top level call handler data. This produces a simple CSV file containing top level call handler details for record keeping purposes.
· View log folder. This opens the folder on the hard drive where ATM is currently storing it’s activity and diagnostics logs.
· Show Adds/Moves/Changes report. Generates a simple CRUD report for all activity in ATM. Any objects that have been created, edited or deleted via ATM will show up in here.
Edit
The edit menu contains the same items offered in the tool bar items detailed above.
In addition it contains options to expand all nodes in the tree or collapse all notes – this will go through and fully expand all nodes for the entire tree – this can take a bit if your system is large and you have a very deeply nested audio text tree currently shown.
Options
The options menu contains two items:
· Show Ignore Keys in Tree. By default this option is checked meaning that all the caller input keys are shown, even if they are set to “ignore”. This allows you to easily right click on them and create new actions off those keys on the fly. If, however, you wish to see a more compact view of your audio text tree you can hide all the ignore keys. Unchecking this option requires that you either reload the tree view or close and expand the nodes – the ignore keys will not be removed if they are already visible in the display.
· Include Debug Info in Log. If there’s a problem with ATM, TAC may ask that you turn on debug and reproduce the issue to capture more details in the log files to help isolate an issue. Normally you’ll want to run with this off since it adds quite a lot of clutter to the logs otherwise.
Favorites
The favorites menu allows you to manage your favorites (deleting and renaming them if you wish) or to select favorites based on the object types (i.e. the favorites are offered for call handlers, users, name lookup handlers and interview handlers separately in this menu). This also has a menu option that corresponds to the menu bar’s “Add Favorite” option detailed above.
Help
Provides menu options for opening the help file for ATM, checking the version of ATM, checking to see if an updated version exists on the ATM home page on www.CiscoUnityTools.com and getting information about the currently attached Unity Connection server.
Using Video
With the release of Unity Connection 11.0, support for video greetings for users and call handlers was included when configured against a MediaSense server. Audio Text Manager has been updated to handle playing back, live recording and uploading pre recorded video for users and call handlers. If a MediaSense service setup is detected when attaching to a Unity Connection server, ATM will prompt you to provide the MediaSense login and credentials (the same ones used to attach Connection). If the login is successful, ATM will show video options in your interface.
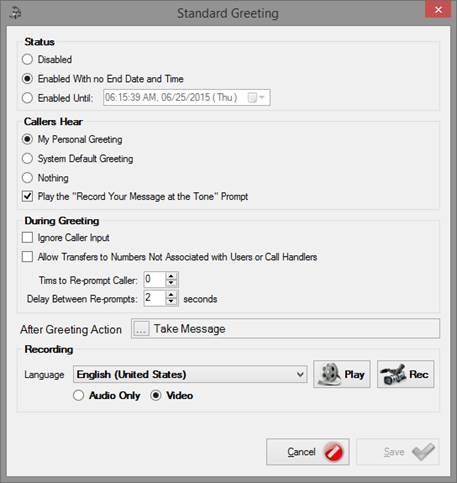
When viewing a greeting for a user or call handler with video enabled, the “Recording” box will include a radio button for “Audio Only” and “Video”. By default Video will be selected if enabled. Remember that if you record a video, callers on audio only enabled phones will still hear the audio track for that video so it’s not necessary (or possible) to record separate audio and video messages for the same greeting.
The Play and Record buttons are separated for video – playback is done via the VLC media player which is installed with ATM. As a rule it’s best to view the video through your phone or video end point to check for quality, size and ratio. The playback setting is provided as a convenience only.
The record option presents a video capture and upload form as seen here:
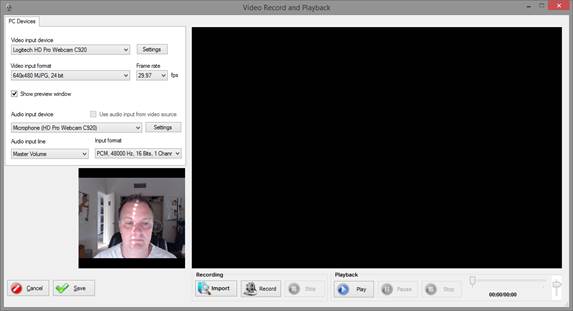
If you have a camera you’ll see an option to show a preview and the “record” button will be available – you can record and playback a video greeting until you’re happy with it and then press “Save” at which point it will be uploaded to Unity Connection and MediaSense (Connection gets the audio track, MediaSense gets the video/audio upload). You can play with the video input format and framerate but it’s advised you leave it at defaults unless you have a specific reason to change it.
You also have the option of uploading a recording using the “Import” button. The video will be loaded into the local record/playback form and you can play it provided it’s recognized – the video form will handle most formats (mpeg, mp4, wmv, avi and others), however the MediaSense server has the following requirements:
· The file must contain one audio track and one video track.
· The video must be encoded using the H.264.
· The audio must be encoded using AAC-LC.
· The audio must be monaural.
· The entire .mp4 file size must not exceed 2GB.
This is the only type of video uploads the MediaSense team tests and supports. You may try other formats and most will be converted and work fine, however the only supported video files must meet the above specifications
Obtaining Updates
There is a function in the Help menu to do an automatic version update check for you and there’s also a “check for latest version” link on the about box.
You can check manually for updates by visiting http://www.CiscoUnityTools.com
Revision History
Version 1.0.0.49 – 7/11/2019
· Removed Visio diagram functionality – licensing requirements causing too many issues
· Fixed TRAP recording sequence to force “keep-alive” connection property in header that is not included by default on subsequent calls to the same server name – causing longer recordings to time out too quickly.
Version 1.0.0.43 – 10/5/2017
· Added ability to generate Visio diagram of current Call Handler tree and it’s sub levels
Version 1.0.0.42 – 8/17/2017
· Added more error handling around recording sequence to catch various Windows errors when no recording devices are present or only unsupported recording devices found.
· Added option to use TRAP for telephone based recording of audio greetings instead of a local recording device.
Version 1.0.0.40 – 5/15/2017
· Removed the background worker setup and replaced it with the 4.5 async/await model for background work.
· Fixed issue where language was showing as “system” instead of “inherit” for call handlers.
Version 1.0.0.39 – 11/8/2016
· Updated to .NET 4.5 framework
· Added logic to support forcing SSL3 connections for HTTP when attaching to versions of Connection older than 10.0.
Version 1.0.0.37 – 7/17/2016
· Fixed an issue when using a call handler as a template for creating a new one where the references to alternate contact numbers under menu entries were reversed and the new entries were copied over the template handler.
Version 1.0.0.36 – 5/27/2016
· Fixed an issue where mixed language video greetings were not being saved as video but audio only greetings.
Version 1.0.0.35 – 2/18/2016
· Added an option to download recording file when reviewing any recording via the playback form
Version 1.0.0.33 – 1/4/2016
· Updated to allow installs into Windows 10 deployments
Version 1.0.0.32 – 11/19/2015
· Updated handler copy logic to continue copying parts of the handler data even if previous pieces may have failed rather than giving up at the first failure.
· Updated stored proc call for greeting update to not assume video greetings present on server
Version 1.0.0.31 – 9/30/2015
· Fixed issue where tbl_video was being referenced on systems that did not have that table constructed yet.
Version 1.0.0.30 – 9/10/2015
· Fixed issue where reference to a user or handler would sometimes show as “looped” in the tree view when that wasn’t the case.
· Added raw FFMPEG binaries for extracting WAV file from video needed for Unity Connection’s audio only playback option – handles some .mp4 files that the default library does not.
· Fixed an issue where adding a menu entry jump to a user or handler from the details pane on the right would not update the corresponding node in the tree view to the left until you collapsed and expanded the parent node first.
Version 1.0.0.28 – 6/25/2015
· Added support for Connection 11.0 video greetings
· Updated Infragistics component libraries for GUI elements.
· Updated REST SDK and JSON library versions
Version 1.0.0.27 – 10/9/2014
· Beta release for video greeting support with Media Sense server
· Added video preview option to the video record and playback form.
Version 1.0.0.23 – 5/26/2013
· Updated logging output to include more high level data for add/move/delete operations.
· Added option to view current log file to the file menu.
· Fixed issue where debug option was being preserved between runs of ATM.
Version 1.0.0.22 – 1/19/2013
· Updated for Windows 8 installations
Version 1.0.0.21 – 7/21/2012
· Updated to work with .NET 4.0 full library.
· Added distribution list membership management feature for users
Version 1.0.0.20 – 5/26/2011
· Produced first version of help for updated ATM.
· Fixed a problem with creation of interview handlers not properly loading the handler after creation.
· Fixed the add objects dialog to make the template selection drop down read only.
Version 1.0.0.19 - 5/18/2011
· Fixed issue with call handler copy function that was not brining over the alternate transfer number properly.
· Changed UI for create routine to automatically load the object (user or handler) created if the operation completed properly.
Version 1.0.0.17 – 11/15/2010
· Added ability to create new interviewers and name lookup handlers when setting one key destinations for call handlers or subscribers.
· Fixed issue where partition selection drop down was including partitions found on other servers in a digital network.
Version 1.0.0.16 – 10/17/2010
· Added option to dump top level call handler data to CSV under the File menu on the main form.
Version 1.0.0.15 – 4/20/2010
- Fixed a problem releasing shared memory resources for recordings and playback on the audio recording dialog.
- Updated recording/playback library to release 4.
- Added COS selection and viewing to the users view.
- Fixed a problem where the caller search space for users was always being saved when edits to a user were made even if that value hadn’t changed.
Version 1.0.0.13 – 3/30/2010
- Added ability to copy existing call handler data, including greetings and voice names, when creating a new call handler instead of using a template.
Version 1.0.0.12 – 2/17/2010
- Added full routing rule management sub system with the ability to create/edit/delete and move routing rules and rule conditions. This is drop 1 of the routing rule design, searching and other UI changes are planned.
- Added search function to routing rules page.
Version 1.0.0.10 – 12/21/2009
· Fixed connection string to force both DB and CLIENT locales to us_utf8 to avoid problems with multiple byte characters.
Version 1.0.0.9 – 10/7/2009
- Added version update check option to the Help menu.
Version 1.0.0.8 – 9/25/2009
- Added support for Connection 8.0 database changes.
- Connected remaining menu items and tool bar items
- Added read only view of routing rules – work in progress
- Fixed a problem with the dependency report where call handler templates were coming up as a false dependency item.
Version 1.0.0.6 – 8/27/2009
- Changed server login/PW memory to filter based on local Windows login name
Version 1.0.0.5 – 6/5/2009
- Added media playback/record/edit options for all greetings, voice names and interview questions.
- Added ability to update most properties on call handlers, user and interview handlers. Name lookup handlers are still to be done.
Version 1.0.0.4 – 5/11/2009
- Added ability to delete users, contacts, interview handlers, directory handlers and system call handlers.
- Added CRUD (Create/Update/Delete) report
- Added history of adds/moves/changes to the MDB file on a per server basis.
- Added default replacement objects used in the delete dialog to the MDB file on a per server basis.
Version 1.0.0.2 – 3/7/2009
- Added update option for profile pages for users, call handlers and interview handlers.
- Added ability to create new interview handlers, name lookup handlers, users, call handlers and public distribution lists
- Added ability to update menu entry keys for users and call handlers from either the details tabs on the right or the tree control on the left using right mouse clicks.
Version 1.0.0.1 – 1/9/2009
- First beta release of the read only version for UI evaluation purposes
© 2017 Cisco Systems, Inc. -- Company Confidential