Cisco Unity Connection Message Shuttle
Connecting
to Unity Connection 7.x or Later
Task
2: Set the Database Proxy Service Shutdown Time
Task
3: Activate the Remote Database Proxy Service
Task
4: For Connection 12.0 and Later Enable Secure IMAP
Task
5: Login to the Remote Server
Troubleshooting
Remote Login Issues
Double
Check Connection Server Settings
Disable
CSA and all Virus Scanning Applications
Make
sure the Informix .NET Driver is Installed and the PATH Points to it.
Configure
the Source Connection Server
Configure
the Target Connection Server
Limiting
which User Messages are copied
Selecting
Users to be Copied via CSV
Adjusting
Threads for IMAP and SMTP Operations
Disabling
Notification Devices on Target
Disabling
Message Actions on Target
Overview
The Message shuttle copies messages from source servers to target servers as quickly as possible. This is useful for situations where you’re migrating users from one Connection server to another using COBRAS and you want to “top off” the messages the night of migration as quickly as possible when shutting down the source server and cutting over to the new.

While you can certainly use COBRAS itself for copying messages from one Connection server to another when, for instance, you are upgrading from a hardware install of a 7.x server to a virtualized install of a 10.x server, the Message Shuttle is 10 to 15 times faster than COBRAS because it’s doing it “on the fly” using multiple extraction and import threads instead of packing messages into a backup database and then unpacking them later for import.
As a rule if you’re moving all users, entire servers or large groups of users between servers best practice is to use COBRAS to move all data except messages and then the day (or night) of the cut over to copy all messages from users on the source sever to the target server using Message Shuttle and after verifying success, decommissioning the source server.
Requirements/Special Notes
This version of Connection Message Shuttle runs on Windows XP, Vista, Windows 7 or Windows 8 or server 2003, 2008 or 2012.
You must install the 32 bit Informix Client SDK version 3.5 or later including the .NET drivers even if you are running on a 64 bit version of your operating system. The Connection Message Shuttle tool is strictly 32 bit. See the Informix Driver Download Page for details.
This version of Connection Message Shuttle only works with Unity Connection 7.0(2) or later.
This tool only works with restricted installs of Unity Connection – Message Shuttle uses secure IMAP for extracting messages which is not supported on unrestricted installations of Connection. You will need to use COBRAS using the /UseCUMI command line option for migrating messages if you are using an unrestricted installation of Connection.
You must enable the ODBC proxy service on the Unity Connection server and attach to the database using an account enabled for the remote database access role. See the next section for details on this.
This tool uses Microsoft’s full .NET 4.0 library (the limited “client” version of .NET 4.0 is not sufficient). The installation will check to see if you have that installed and if not will offer you the option to download and install it automatically.
You must enable Google Workspace UMS only after successful restore on target server. It will enable message syncing between Google Workspace and Target Unity Connection.
Connecting to Unity Connection 7.x or Later
For installations of 7.0(1) and later you need to use the database proxy service for access to the database from off box for any DB tool including Connection Message Shuttle.
Task 1: Configure a User without a mailbox with the Remote Administrator and System Administrator roles
1. Go to the Cisco Unity Connection Administration web interface for your installation.
2. You can leverage a user with or without a mailbox for off box data access purposes, but it’s strongly suggested that you create a new user without a mailbox that is used solely for the purpose of remote administration tasks for security reasons. This is also required if you want to export messages from a Connection 7.0(2) or later server – a user with a mailbox may not be allowed to extract messages from other mailboxes, whereas a user without a mailbox should have no problem.
3. Be sure the web administration password for this user is not configured to require a change at first login on the “Password Policy” page for that user.
4. If necessary, change the web administration password on the “Change Password” page. Note that only the web application password comes into play for remote data access.
5. Finally,
on the “Role” page for the user, add the “Remote
Task 2: Set the Database Proxy Service Shutdown Time
This step is not necessary if you are running against a 10.0 or later server.
Out of the box the database proxy service is not running and if you try to start the service it will shut down right away. First you need to set the “Database Proxy: Service Shutdown Timer” value found in the System Settings -> Advanced -> Connection Administration section of the Cisco Unity Connection Administration page. By default this is 0. You can set it to as high as 999 days if you like. After the number of days configured here the remote database proxy service will shut down. This is useful if you want to do some migration work, for instance, and don’t want to forget to have the service disabled for security reasons.
NOTE: If you restart the server, the remote database proxy service will remain shut off. After a system restart you have to go in and manually turn on the service again (see step 3)
Task 3: Activate the Remote Database Proxy Service
1. Out of the box the service that listens to remote database requests is not active, you must turn it on. To do this, go to the “Cisco Unity Connection Serviceability” web admin page.
2. On the Tools menu, select the “Service Management” page.
3. The “Connection Database Proxy” item under the “Optional Services” section will be marked as “Deactivated” and stopped. Press the “Activate” button and it will be activated and started automatically.
Once you’ve started the proxy service you can connect with any tool that needs off box database access using the user name, web administration password and port “20532”.
NOTE: The service will automatically shut down after the number of days configured in step 2 above or if you restart the server.
Task 4: For Connection 12.0 and Later Enable Secure IMAP
Connection 12.0 and later ships with secure IMAP connections turned off by default. For message extraction in 12.0 and later you must:
1. Attach the server to a licensing service. You cannot turn on secure protocols for a server that is not licensed – as such you cannot extract messages via IMAP until you’ve licensed the server.
2. From the Unity Connection CLI logged in as an administrator you need to run the command “utils cuc encryption enable”. Once this is done successfully the secure IMAP connection used by COBRAS and other tools will be enabled.
Task 5: Login to the Remote Server
When you first start Connection Message Shuttle, you will see a login dialog box that will be empty except for port 20532 filled in as the default for the port. You must provide the server name or IP address for the “Server” field and provide the login and password for the database connection account. Use the alias and web administration password of the database user created above for the login and password fields.
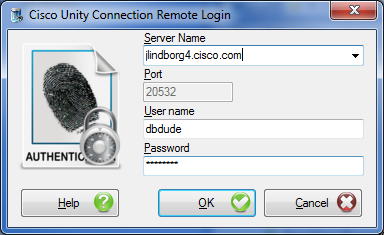
Connection Message Shuttle will remember your entries including the password (which is stored in a secure hash). Each time you run Connection Message Shuttle it will load the settings of the last connection you made. Every server you’ve successfully connected to in the past will be listed in the drop down list in the order in which you connected to it last – most recent to least recent.
NOTE: The login and password information is stored along with the local Windows login name. Only those servers that have been attached to successfully using the current Windows login will be listed. If you are logging into the same Windows server with different users you will only see servers connected to with that particular Windows login.
NOTE: Providing the wrong password or login will fail quickly and give you a chance to try a different pair. Providing an incorrect server or port, however, results in a 60 second timeout while UDD waits for the Informix driver to return. Unfortunately this cannot be shorted. Type carefully.
Troubleshooting Remote Login Issues
Double Check Connection Server Settings
Make sure the remote database proxy service is running. This service does shut itself off after a period of time and does not start itself automatically on a server reboot.
Make sure the user you are logged in as has the remote administrator role assigned to their account, that their password is not set to reset at the next login and that their account is not currently locked.
Make sure the server name or IP address you are using to connect with is reachable from your Windows client. DNS issues often come up in connection failures.
Disable CSA and all Virus Scanning Applications
It’s a good idea to disable CSA and all virus scanning applications if you are having problems connecting to be sure the ODBC port (20532) is not being blocked. Also check your firewall settings (assuming you are running one).
Make sure the Informix .NET Driver is Installed and the PATH Points to it.
For 32 bit OS installs, the IBM Informix driver is installed in C:\Program Files\IBM\Informix\Client-SDK. Make sure this path exists on your server and has not been removed or renamed.
The system PATH variable will also include a reference to the “\IBM\Informix\Client-SDK\bin” location where the driver is installed. Make sure this path is referenced in the PATH. Also, if the PATH is very long sometimes the Informix driver will not find it, try moving it to the beginning of the PATH statement.
If you had an older version of the IBM Informix Client SDK installed it's a good idea to uninstall all other versions and make sure you have a single instance of the SDK 3.5 or later. Mixing versions of Informix drivers is not a good idea as only one can be active at a time.
Connection Server Preparation
Configure the Source Connection Server
The source Connection server needs to only have the ODBC proxy enabled and configured for an account that has the remote administrator role enabled to log in. If it’s a restricted version of Unity Connection then that account can use secure IMAP to access all mailboxes on the server and you can proceed. If you are using an unrestricted installation of Unity Connection you cannot use the Message Shuttle tool.
Configure the Target Connection Server
NOTE: One item folks always forget about is mailbox quotas on the target server. Message Shuttle cannot “ignore” these, it doesn’t control their enforcement. Please be sure to either turn off quotas entirely while doing the migration or set them appropriately high such that the messages will all be imported properly.
On the target Connection Server you need to open up the SMTP drop folder to accept messages coming from the application – this means enabling connections from untrusted IP addresses since the desktop you’re running the Message Shuttle on is not going to be a trusted server. To do this follow these steps:
1. Go to the “SMTP Configuration” section of the “System Settings” in the Cisco Unity Connection Administration web page.
2. On the “Server” page check the “Allow Connections from Untrusted IP Addresses”
3. Uncheck the “Require Authentication from Untrusted IP Addresses”
4. Select “Disabled” for the “Transport Layer Security from Untrusted IP Addresses” and save your changes.
The Unity Connection SMTP Server configuration page should
look like this at the bottom:

Ports Use by Message Shuttle
Message Shuttle uses IMAP to extract messages from the source server and SMTP to import messages to the target server and uses ODBC database access to both servers. You’ll need to make sure the ports needed for these interfaces are not blocked between the target and source Connection server and your client you’re running Message Shuttle on and are not being blocked by any anti-virus packages you may be running in your organization.
· IMAP for extraction of messages from the source Connection server uses port 7993. This is for secure IMAP and will only work for restricted installs of Unity Connection as unrestricted installations do not support secure IMAP connections.
· SMTP for pushing messages into the target server use standard SMTP port 25.
· Both source and target servers use ODBC connections which use port 20532. This, of course, also requires the ADO/ODBC client drivers from IBM for Informix to be installed on the box you’re running Message Shuttle on. http://www.ciscounitytools.com/Applications/CxN/InformixODBC/InformixODBC.html
Using Message Shuttle
Basic usage of the Message Shuttle is designed to be very simple. Once you’ve logged into the source (pulling messages from this server) and the target (pushing messages to this server) Connection servers, it will automatically determine how many users from the source server are found on the target using the alias as the search mechanism.
NOTE: alias matching is the ONLY way Message Shuttle matches users from the source and target servers. If you are changing alias naming conventions and wanting to copy messages all at the same time, COBRAS is the only choice here – see the COBRAS documentation for details.
If you wish to copy all messages from the mailboxes of the source to the target then you do not need to do anything else other than press the “Start” button and wait for the process to complete.
NOTE: Message Shuttle only COPIES messages – it will never remove messages from the source server and it will never create duplicate messages on the target not matter how many times you run it against the same two servers. The unique Message DB ID is used when copying messages which ensures no duplicates are created.
NOTE:
If the source server
and the target server SMTP domains are different while the migration of
messages is being done then before migration make sure to add the SMTP Proxy
address of the users on the Target server to be same as the SMTP address of
the user on the Source Server. This will avoid the problem of losing the
original sender on the target server.
Limiting which User Messages are copied
If you do not want all users with matching aliases from the source have their messages copied to the target, you can restrict which mailboxes are included using the “Limit Which Mailboxes are Copied” menu item under the Options menu. This will bring up the mailbox selection dialog which looks like this:
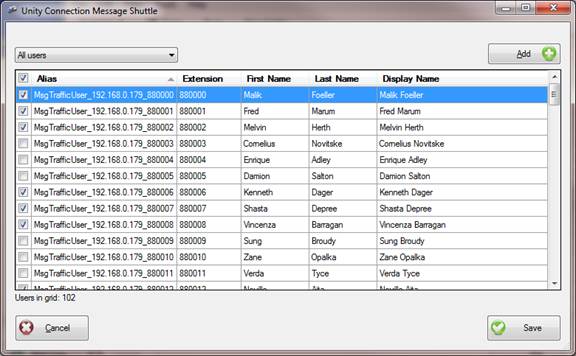
By default all user mailboxes are checked – you can manually uncheck individual mailboxes, uncheck them all and select only a handful of mailboxes for testing etc…
As noted all mailboxes are checked by default so if you want to only copy a handful you need to select “all users” and use the “uncheck all” box in the upper left to first uncheck everyone then use one of the other selection items to choose a subset of users to copy.
Once you’ve selected the mailboxes you wish to copy you can hit the “Save” button and the main form will reflect the updated number of users to copy and the total number of messages that need to be copied to complete the operation.
Selecting Users to be Copied via CSV
One of the options when selecting users to have their mailboxes copied is to select them from a CSV file you can select. This file needs to have column headers for “Alias” and/or “Extension”. All other columns are ignored. So a CSV file looking like this will work fine:
Alias, Extension, FirstName, LastName, …
jlindborg,1234, Jeff, Lindborg, …
jsmith, 4567, Joh, Smith, …
…
If both Alias and Extension are provided, both are searched for (i.e. only users matching both the alias and extension will be included in the list). It’s legal to only provide one or the other instead and then only the alias or extension will be looked for. If more than one extension matches (i.e. duplicates across multiple partitions) the match will be failed. Aliases are unique across the entire system.
Adjusting Threads for IMAP and SMTP Operations
As a rule you should not adjust the number of IMAP and SMTP threads from their defaults under the Options menu unless directed to do so by TAC. These dictate how many separate threads are pulling messages from the source Connection mailboxes (IMAP) and send the message to the target (SMTP) servers. More threads is not better here and in some cases can simply introduce unnecessary overhead and slow things down.
If the “Messages in Queue” show on the main form is never getting above 1 to 5 or so messages (it tops out at 200) then it may indicate you need to add another IMAP thread since queue should normally be full or nearly so after the migration has been running a few minutes. This doesn’t hurt anything but you may be able to get a little more performance out of you migration this way. If the message queue number is staying above 30 or higher messages during copy there’s no reason to adjust this value.
Adding additional SMTP threads should only be done if you’re working with TAC and have introduced more processing threads and additional mail stores on the target Connection server. Otherwise this value should be left alone.
Message Copy Options
Disabling Notification Devices on Target
By default Message Shuttle will find all active notification devices for all user’s that are having messages copied and disable them. Once the process is complete the devices are activated again. This prevents “notification storms” during the message copy process.
Under the options menu is a checkbox called “Disable Active Notification Devices on Target Before Copying” that can be unchecked if you do not wish this behavior.
Disabling Message Actions on Target
By default Message Shuttle will set all message actions for all users that are having messages copied that are set to “accept and relay” or just “relay” to “accept” (reject and accept states are left alone). This prevents messages being copied into those mailboxes from being resent to external SMTP addresses. Once the import is complete the message actions that were changed are set back to what they were prior to import.
Under the options menu is a checkbox called “Disable Message Actions on Target Before Copying” that can be unchecked if you do not wish this behavior.
Including Deleted Messages
By default deleted messages are not included when copying mailboxes between the source and the target. All other messages (read, unread, seen, unseen) are copied.
You can choose to include deleted messages by checking the “Include Deleted Messages” item under the options menu. Be aware, however, the messages will appear as new messages on the target mailbox – Connection does not provide a way to import a message via SMTP that’s been deleted and since Message Shuttle is dropping messages into the SMTP pickup folder for migration these messages will be imported as normal new messages.
It’s recommended that deleted messages not be included to keep the migration time minimized and user experience clean.
Obtaining Updates
To check for updates to this tool, visit http://www.CiscoUnityTools.com
Revision History
Version 1.0.19 – 05/09/2025
· Fixed CDET CSCwn22050 - Implement TLS1.3 support in Message Shuttle Tool.
Version 1.0.18 – 10/26/2022
· Fixed Issue : Duplicate Message on UMS while using Message Shuttle during migration.
Version 1.0.17 – 6/02/2021
· Added support for Google workspace UMS mapping data restore. It enables user to perform Google Workspace <-> Cnx sync after successful restore.
Version 1.0.16 – 1/06/2021
· Fixed issue : Message Shuttle does not Skip remains STUCK infinitely if Message attachment is missing/corrupted.
Version 1.0.15 – 9/18/2018
· Added option to disable all message relay actions for users on the target Connection server prior to copying messages and restoring them when done.
Version 1.0.14 – 8/16/2018
· Updated .NET version from 4.0 to 4.5.2
· Updated dependent NuGet libraries for JSON.net, ChilKat and other libraries.
· Updated help file to note details on CSV file format for selecting users for mailbox copy.
Version 1.0.13 – 7/14/2017
· Added more logging details around messages skipped
· Added summary section to end of log detailing before/after target message counts, messages copied and messages skipped.
Version 1.0.12 – 1/2/2016
· Updated setup for Windows 10 deployments
Version 1.0.11 – 3/18/2015
· Updated ChilKat and Sqlite libraries and switched to NuGet deployment options for both.
· Updated setup to include all modern Windows and .NET library versions.
Version 1.0.10 – 11/25/2014
· Updated log file opening logic during login to source and target to consolidate into one file instead of two.
· Updated debug event handling to log more details during the initial mailbox copy setup routines.
Version 1.0.8 – 9/2/2014
· Added the option to disable notification devices on the target server before starting copy process and re enable them when it’s done.
· Added option to include deleted messages – restored as new.
Version 1.0.7 – 7/29/2014
· Added server versioning information to the log output at the start of message copy
· Fixed selective mailbox copy option to exclude all mailboxes, even those not shown in the search results.
· Added extra SMTP settings check prior to import to make sure security settings are valid.
Version 1.0.6 – 5/4/2014
· Added ability to limit which mailboxes are included in the copy operation.
· Updated UI to include count of messages selected on the main form
· Changed message count logic to pull from the view instead of the table in the messages database to properly account for single instance message logic in the count.
Version 1.0.5 – 2/3/2014
· Added support for “interleaving” message restore to multiple mailstores on target Connection server.
· Updated progress update and logging details for message migration process.
Version 1.0.4 – 12/13/2013
· Added support for duplicate message detection and tracking.
· Fixed support for multiple mailstore databased on both the source and the target
· Added rough help file support
· Improved thread contention issues
· Updated handling of 452 errors (full target drop box folder)
Version 1.0.1 – 12/10/2013
· First beta drop of tool for internal testing
© 2018 Cisco Systems, Inc. -- Company Confidential