Find and Connect to Remote Unity Servers
If You Are Running 4.0(1) READ THIS
Configuring Rights to UnityDB in SQL
Overview
This tool demonstrates how to enumerate all the domains on a network, find all the SQL servers running in a selected domain and how to determine if that server is running Unity or not by connecting to the UnityDB database (if it exists) in SQL on that box. It also shows how to get at some Unity data not available in SQL by using a web page to retrieve XML strings to retrieve licensing info, the version of Unity, which back end server it’s configured for, etc. Note that this example only works properly with 4.0(2) with the Cisco Unity Access Library (CUAL) files installed. The CUAL setup can be downloaded from the code samples page of www.CiscoUnityTools.com

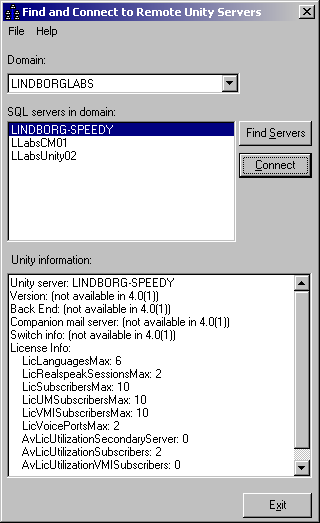
Use of the tool is very simple. When you start it up all the domains found on the network are included in the “domains” drop down list. If no domains are found on the network then the tool will display an error message and exit out. Since Unity must be in a domain the fact that you can’t see any domains precludes finding any Unity servers on the network.
Once you’ve selected a domain you can hit the “find servers” button. This will return all the servers in that domain running Microsoft SQL (any version). In the screen shot above you can see this list includes Unity and Call Manager servers on my test configuration.
To test if a box is a Unity server, select it in the list and press “connect”. If the server is running Unity 4.0(2) or later and the account you’re running as has read rights to the UnityDB database, it’ll show basic information about the Unity server in the “Unity Information” text box. If the connection fails to find a UnityDB database or your account doesn’t have rights to it, an error dialog will come up to that effect.
See the “Configuring Rights to UnityDB in SQL” section below for details on the rights issue.
If You Are Running 4.0(1) READ THIS
Configuring Rights to UnityDB in SQL
By default when you install Unity, the UnityDB database (along with the less interesting ReportDB database) are added to the local SQL 2000 or MSDE 2000 such that only members of the local Administrators group (or BUILTIN\Administrators group in the case of a domain controller) have read and write access to the databases. If you want to be able to remotely attach to and, optionally, update these database as part of a programmatic administration project with Unity 4.0(1) or later, you’ll need to make sure the accounts your applications are running under have sufficient rights to these tables.
While it’s possible to allow login names and passwords to be defined for SQL authentication, it’s strongly recommended you don’t go that route. Sending login and password information across the wire when you attach to the database is a remarkably poor idea. For folks wanting to do these types of projects directly to SQL I highly recommend relying on Windows authentication for determining access.
There are several ways to do this, however the easiest method is to create one or more security groups (perhaps one for read only and one for read and write access) in the domain and configure that group up for access to UnityDB on all Unity servers. Users can then simply be added to or removed from these security groups to allow or restrict access as necessary.
You can do this directly in SQL using the “GRANT” command if you know what you’re doing – I’m not going to cover that here. You can take a look in the T-SQL help for details if you wish to do that. The easiest way to do this is through the Enterprise manager. Remember that even though the Enterprise Manager doesn’t install by default with MSDE our license agreement with Microsoft allows you to install this (and the SQL Query Analyzer tool) from the SQL 2000 CD.
To setup a specific account or a security group to have access to the UnityDB database, fire up the Enterprise manager, select the local database and open the “Security” node and choose the “logins” item. This is shown in the following screen shot:

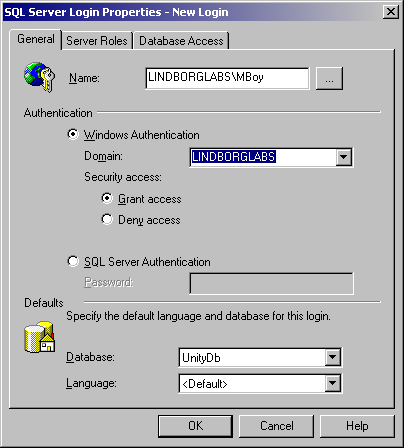
All access to all database on the local server is controlled through this interface. To add a new item select “new login” from the Action menu or by right clicking on the right portion of the screen. This brings up the ‘New Login’ dialog shown in the next screen shot:

On the “General” tab be sure to select ‘Windows Authentication’ and choose a domain. Then press the “…” button to the right of the name field and select either a specific account or a security group you want to grant rights to. Then make sure you select the “UnityDB” option in the Database drop down at the bottom.
There is no need to do anything on the “Server Roles” tab – it should never be necessary to drop tables, add databases or do anything of the kind in your typical programmatic administration applications. It’s a generally poor idea to go giving these roles out to a large number of folks so leave this tab alone unless you have a real specific need.
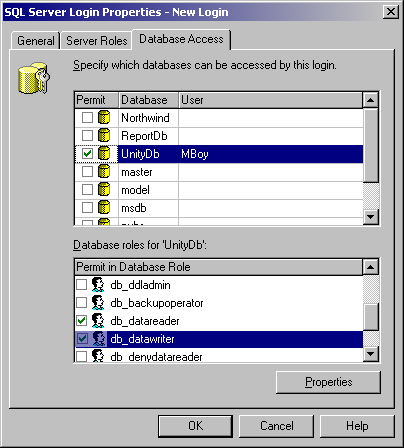
Next, select the “Database Access” tab, shown here:

On this tab you can decide if users have read or read and writes. Select the “UnityDB” database and check it. In the “Database rolls” list box select the access you want to give to this account or group. The “public” option should always be checked and the only other options you should really allow is the “db_datareader” for read access and “db_datawriter” for write access. Again, the need to grant additional rights for adding tables or columns or granting access or the like should not be necessary for typical remote administration tasks. You should only fiddle with those if you have a real specific need to do so.
Obtaining Updates
You can get updates to this code example and all other samples and tools at www.CiscoUnityTools.com
Revision History
Version 1.0.2
![]() Updated for 4.0(2) release
Updated for 4.0(2) release
Version 1.0.1
![]() First ship of example code
First ship of example code
© 2003 Cisco Systems, Inc. -- Company Confidential